I'm not sure how the red in the frame turned out so 'bright' in the after pics, but I hardly think it was all due to my efforts! I did not do any color adjustments or other manipulation after the pics were taken. I guess the camera used for the after pics was a bit more sensitive.
When I initially inspected the bike, it looked like it was in rough shape. Dirt, rust, dried-on grease. However, I was pleasantly surprised when I did a deeper inspection. No rust inside the frame, bearing surfaces on the BB and headset showed very little wear, uniglide cogs in great shape, and aside from scratching and fading, the components were all mechanically sound.
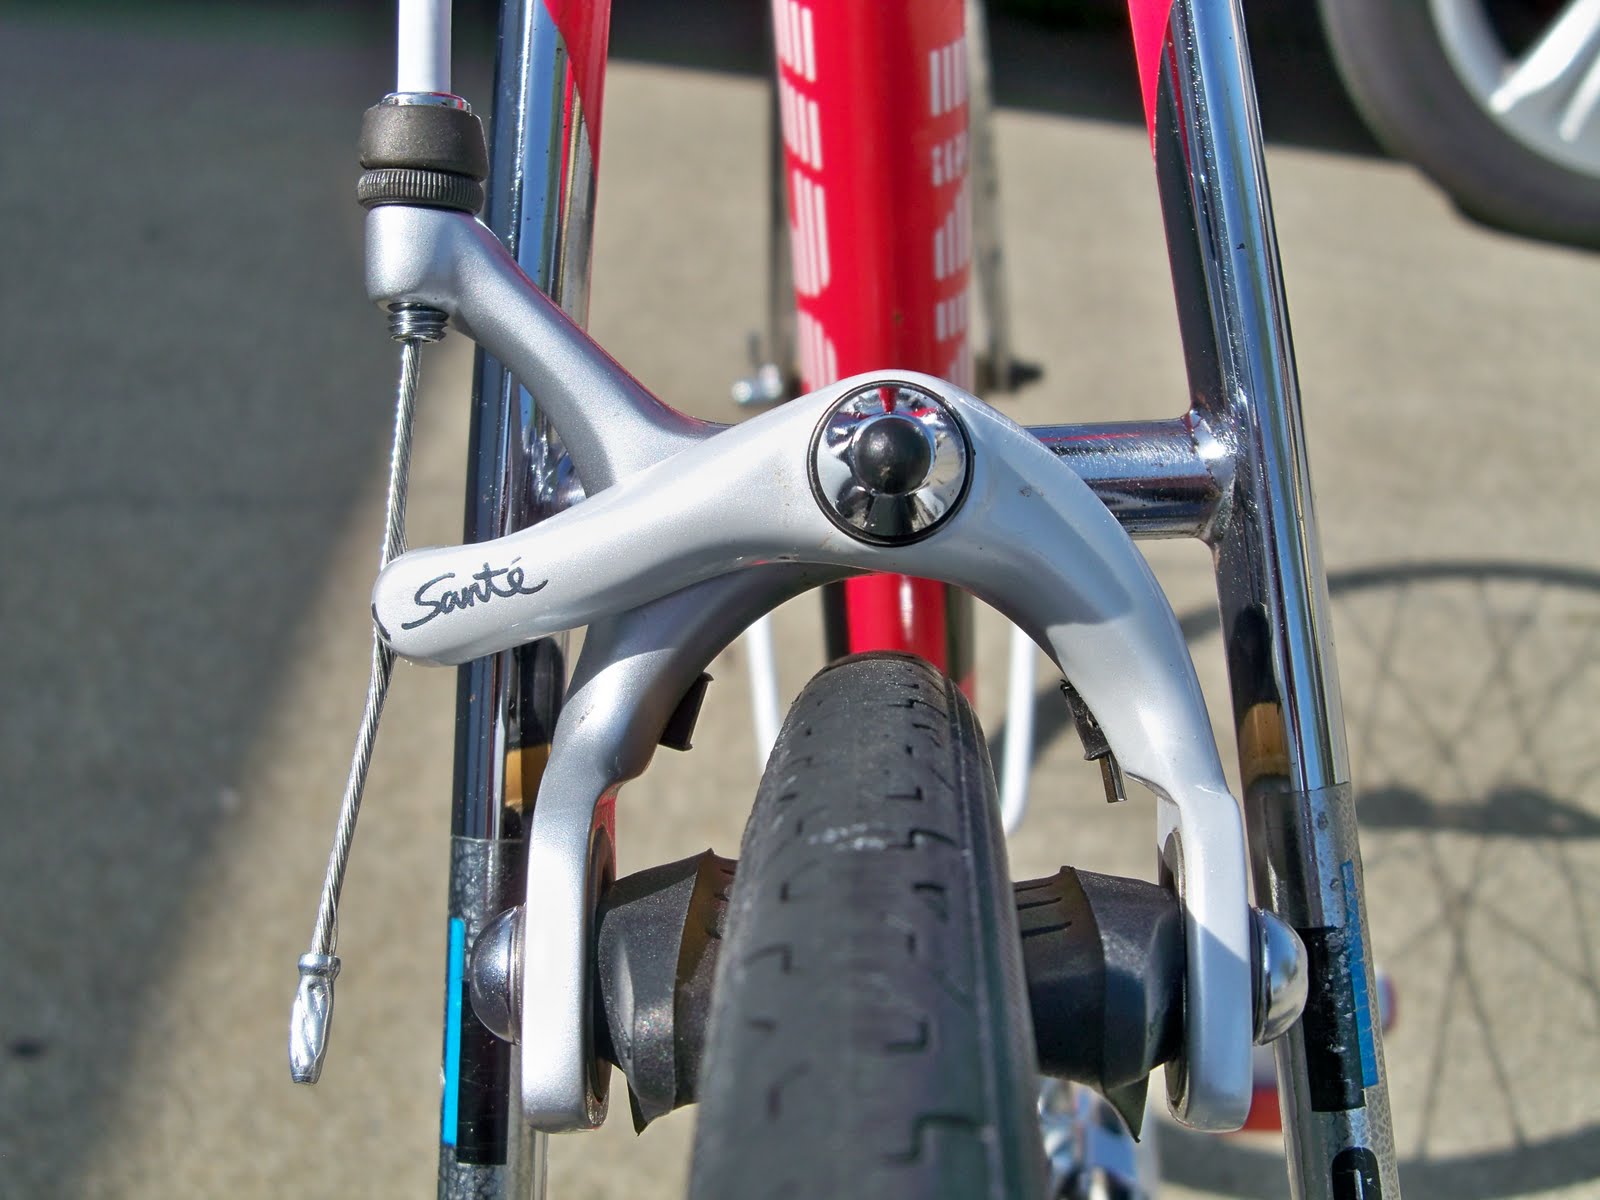
Very little $$ spent on this project. Everything was in great shape and all I needed was a new KMC chain, cables, tape, and splurged on a Selle San Marco Concor Supercorsa re-issue saddle. Vintage Schwinn aficionados will notice the use of white brake housing instead of the factory clear. I would've liked to go with the clear housing, but it was just too difficult to find and I had some of the white lying around so I used it.


After removing all the components, I rubbed the frame down 5 times. In order: rubbing compound, polishing compound, color restorer, cleaner wax, and finishing wax. Doesn't take as long as you think, and the results look pretty good. I also did my first dabbling in applying Testors as touch-up paint, with mixed results. That was a royal PITA since there were so many little chips to touchup and each on required me to color match and sand down with 8 polishing cloths before doing the above 5 polishing steps.
Headtube


Front Brake


Drivetrain


The cranks and other painted surfaces got the same 5-step treatment as detailed above for the frame. Interestingly, the white pearl finish appeared to be a bit faded and yellowed on the cranks and shifters that no amount of buffing would restore. You can tell the difference by looking at the 'whiteness' of the brake levers and comparing them to the cranks.
Bottom Bracket


The Columbus Tretubi decal is in bad shape, but enough of it is still there to make it readable.
Rear Brake Bridge


I tried a couple different methods to remove the rust here; WD-40 and also Simichrome polish. Unfortunately, I don't think I was careful enough and left some fine scratches on the chrome. Also unfortunately, some of the WD-40 appeared to have run down the seatstays and crazed the cheapo Schwinn decals there.
Rear Brake

Shifters


Rear Cluster


Hi,
ReplyDeleteFirst of all I think you did a really great job! I came across your blog while doing some research on a Schwinn Circuit that I may buy.
I have a few suggestions for you. When removing rust from chrome I use a mixture of a wet chain lube and orange oil. Finishline sells the orange oil and some other synthetic based degreaser, but I prefer to order it direct from Florida in 5 gal containers. Why so much, you may ask, it's because I am constantly restoring, repairing, rebuilding vintage bicycles and I go through this stuff like you wouldn't believe. But I digress. What I do is mix a few drops of the wet chain lube on a small plastic cap, then mix in an equivalent (roughly) amount of orange oil. Then, the secret is to use BRASS wool, not steel wool, to get the rust off. Brass wool leaves little or no marks on the chrome.
An alternative is to use kitchen scrubbing pads. Use the ones with the white scrubbing pad, not the green one. These are usually made for use on teflon surfaces and don't scratch as much. Prior to doing any scrubbing, with brass wool or scrubbing pads, coat the affected areas and let the oil soak in for at least an hour, overnight if possible. It makes a huge difference.
For cleaning rags I use old t-shirts. My friends save their old ones for me since I go through these a lot.
The orange oil is a great degreaser as well, I use it and an old stiff toothbrush to degrease the derailleurs, bottom bracket, headset, and anything else with grease. Amazingly, it's much more gentle on wet-transfer decals which are susceptible to damage from WD-40 and similar synthetics. Try on an inconspicuous place first, of course. Very important, pure orange oil is made from nothing more than squeezing orange peels. The one I use is food-grade, what I mean is, it's natural, biodegradable, and tastes good (but not after degreasing your chain).
Orange oil should always be wiped off after it serves its purpose. It doesn't evaporate as readily as WD-40 or other synthetic solvents (which is good for the environment), so it'll sit on nooks and crannies of your frame. When I'm cleaning grease off of a bottom bracket and it has top-mounted cable guides, I use cotton wipes and alcohol. Alcohol after all evaporates quickly.
Oh yes, and I keep a couple of bamboo chopsticks handy. These work great for removing stubborn rust crust on certain chrome components, and the inside of derailleurs and other hard to reach places. I usually end up sharpening the chopsticks now and then with a utility knife. Toothpicks and cotton swabs complete the picture, if you're that meticulous.
Lastly, one other tool that never leaves my side is my swiss army pen knife. the blade, when angled correctly, can also scrape off stubborn rust spots without damaging the substrate. Plus it's sturdy enough to remove burrs and other factory defects from alloy components prior to polishing.
There are two ways of polishing. Cheap and dirty, which is what I do most of the time, is with a sanding pad I get from Home Depot paint department. It actually feels like very fine steel wool, but it's some kind of fine nylon mesh pad with very fine gritty material. They have different grades and I use them all to get the alloy parts to a very nice sheen, particularly when the component is not anodized. Of course these get lubricated with the mixture of oils I mentioned before.
The second step in polishing is something that I reserve for special bikes. I purchased a bench-top two-wheel grinder from Home Depot ($40) and replaced the grinding wheels with buffing pads, one for the initial buffing and another one for fine. This gives the parts mirror finish.
Good luck on your projects!
Carlos
Hey Carlos,
ReplyDeleteWow, thanks for all the great tips! I'll definitely try some of your techniques and I'm sure many of the Valued Blog Readers out there will find the information useful as well.
I'd love to get a bench grinder with polishing wheels at some point to really get those parts shiny, but I just don't have the space right now for the bench! (Unless I mount the grinder on a wall in the kitchen, but I think Mrs. Mauidude might have some choice things to say about that!) See http://mauisvintage.blogspot.com/search/label/Wife%20Acceptance%20Factor
If you have any pics of your restoration projects, send them my way; I'd love to see them!
Mostly I have 'after' pics, but with the next batch of bikes I'll be doing before and after, and I'll be happy to share those. In fact, I'll take some short videos of the process, which is probably more useful. Here is the only one with worthwhile before/after:
ReplyDeleterear derailleur before:
http://i343.photobucket.com/albums/o476/chileros_bikes/Falcon%20before%20rebuild/DSCF6247.jpg
rear derailleur after:
http://i343.photobucket.com/albums/o476/chileros_bikes/falcon%20after%20but%20work%20still%20in%20progress/03arearderailleur-1.jpg
crankset before:
http://i343.photobucket.com/albums/o476/chileros_bikes/Falcon%20before%20rebuild/DSCF6248.jpg
crankset after:
http://i343.photobucket.com/albums/o476/chileros_bikes/falcon%20after%20but%20work%20still%20in%20progress/06crankset.jpg
Nice work, Carlos!
ReplyDeleteI've got tons of projects I'm itching to get to and barely even have time to think about them much less getting down to nuts and bolts.
BTW, did you ever get around to acquiring that Circuit? They're very nice bikes, I'm sure you'd enjoy working on it as well as riding it. And of course, pics please! :)
Hi!! Just wanted to say GREAT JOB on the circuit!! Do you still own it btw? I was doing a little research on a basket Circuit I just bought and I stumbled across your page. Wonderful pics and thanks for all the tips. This will be my first vintage bike resto, but I'm not a total noob at restoration, I've done a few classic autos, so hopefully i wont be too lost.
ReplyDeleteI am not in possession of my circuit yet, i will be getting it in a few days, its ROUGH, but all the Sante stuff is there and it has the white seat. Hopefully, the seat isnt beyond repair.
My circuit appears to have spent alot of time outdoors and has rust on the cable guides on the top tube... I really cant wait to apply love love and elbow grease and see what i can make of the whole thing.
Just a few weeks ago i bought a mint, i mean MINT '86 schwinn prelude and i am enjoying it immensely, I just know the Circuit will absolutely put it to shame when its all fixed up.
anyway, i've rambled on too long, thats a great bike you have, thanks for sharing!!!
Andy
Hi Andy,
ReplyDeleteThanks for the comments! I'm still in possession of the Circuit and it was my main ride for most of last year. Send some pics my way. I'd love to see the 'Before & After' shots!
Hi Maui Dude, Andy here again, please check this thread for pics and story of my Circuit project, started last week... Your story has been informative and inspirational!!
ReplyDeletehttp://www.bikeforums.net/showthread.php/710289-1988-Schwinn-Circuit-Project-bike-(with-pics)
Wow Andy, looks stunning!
ReplyDeleteI was actually following that eBay auction... I was thinking someone was going to score a great bike for cheap! Bummer about the non-original parts though...
As for decals, you could always go with the old-school Schwinn font on a white wrap-around background. A reader sent me pics of his 87 Circuit that had those decals and I was very impressed with the final results. Might not be your thing, but it had a very classic, very older-old-school, very Schwinn look to it if that makes any sense.. :-)
Oops! Just read your comment about decals. Forget what I said ... :-)
ReplyDeleteThanks. Actually the only thing original i am missing right now is the RD. A member on BF donated a Sante FD for shipping cost!! I dont think the RD will be hard or very expensive to find, I might even be able to do a trade for the 600 that is on there... I'm not too worried about it. I hated to repaint the crank arms but they were nasty and had been painted before... There is an NOS crankset on fleabay right now for $$$$...Im drooling!!
ReplyDeleteI may do decals one day if i find a NOS correct set, I'll keep my eye out. I'll probably get the tretubi sticker for it :)
Thanks for the comments!!
andy
Maui Dude,
ReplyDeleteThanks for your blog. I pulled my '88 Circuit out of the attic a couple of days ago and then looked on the web for info on how to revive it. I purchased mine new in '89 at a good price. Schwinns were not selling well. After a few years of use it got pushed aside due to marriage, kids and moves to locations that were not as bike friendly. Mine is 100% original (same rims as yours) except that I added red Look pedals. I think I have the original pedals in a box somewhere. Your pictures have inspired me and I hope to revive mine.
Paul
Hey Paul, thanks for the comment.
ReplyDeleteIn my opinion the Schwinns from the 80's are somewhat underrated (with the exception of the Paramounts). I still find myself choosing the Circuit more frequently than any of the other bikes in stable.
Good luck with your project, have fun, and let me know if you need any help with anything!